Cloud-free integration with Home Assistant
Oh the joy to be free of the cloud. (Someone elses computers!)
Overview
Here we document how to free your Silvercrest Gateway from the cloud for an offline integration into Home Assistant.
Steps are:
- Get the root password.
- Setup device for Home Assistant control.
- Using Home Assistant's ZHA to integrate the device.
Getting root password
The process is documented here.
Setting up device for Home Assistant control
Before starting, ensure your device is on your local network. If you're unsure of its IP address, issue an ifconfig command on the serial console.
To set up this device we need to:
- Install a serial port to TCP/IP gateway program.
- Disable the Tuya Applications.
- Set the TCP/IP gateway to boot on startup.
1) Copy the MIPS(LX) compiled serial gateway to the device. Download here:
From your host PC:
cat serialgateway.bin | ssh -p2333 [email protected] "cat >/tuya/serialgateway"2) Modify the boot script to disable the Tuya Applications and instead start the serial gatway.
On the device, execute the following:
if [ ! -f /tuya/tuya_start.original.sh ]; then cp /tuya/tuya_start.sh /tuya/tuya_start.original.sh; fi

cat >/tuya/tuya_start.sh <<EOF
#!/bin/sh
/tuya/serialgateway &
EOF
chmod 755 /tuya/serialgateway
This will backup the original tuya_start.sh script and replace it with a simpler one that simply starts serialgateway.
3) (Optional) Disable the Tuya customised SSH server and revert to the "standard" dropbear SSH server on port 22.
NOTE: After this step, the SSH server will be available only on port 22 and not 2333.
On the device, execute the following:
if [ ! -f /tuya/ssh_monitor.original.sh ]; then cp /tuya/ssh_monitor.sh /tuya/ssh_monitor.original.sh; fi
echo "#!/bin/sh" >/tuya/ssh_monitor.sh
If you're happy that everything worked, reboot and your device is now controllable by Home Assistant on port 8888.
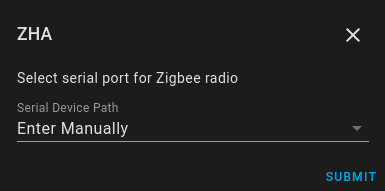
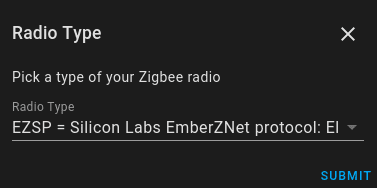
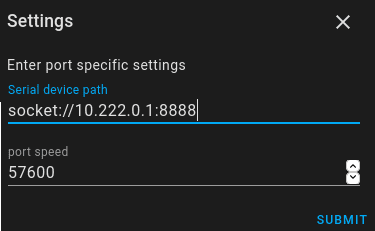
Using Home Assistant's ZHA to integrate the device.
1) Create a new integreation of "Zigbee Home Automation"

2) Select enter manually for the port

3) Pick the EZSP radio type

4) Enter the ip address of your device in this format socket://ip.address:8888

Enjoy!